इन्द्रियाणि पराण्याहुरिन्द्रियेभ्य: परं मन: |
मनसस्तु परा बुद्धिर्यो बुद्धे: परतस्तु स: || 42||
मनसस्तु परा बुद्धिर्यो बुद्धे: परतस्तु स: || 42||
BG 3.42: The senses are superior to the gross body, and superior to the senses is the mind. Beyond the mind is the intellect, and even beyond the intellect is the soul.
--------------------------------------------------
I found this design from net .......years back I am posting it here to crochet in near future
The Gnam bread bin from Alessi is made from thermoplastic resin and comes in black, white and orange. (Amazon.com doesn’t have the orange version.)
--------------------------------------------------
I found this design from net .......years back I am posting it here to crochet in near future
 |
| window valance |
Window Valance, Tiebacks and
Curtain Edging
Materials
Oswal yarn (It takes about one 50 gram ball of Oswal yarn) to crochet each 12" of the valance. To figure the amount of yarn needed for the valance,
multiply the width of your window (in inches) by 1.5 or 2, depending on the fullness desired, to determine your final
width. Divide the final width by 12 to determine the number of 50 gram balls needed.) Add 1 more 50 gram ball for coordinating tiebacks and curtain edging.
Crochet hook size F
Alternate yarn: You can use 2 strands of size 10 cotton thread held together.
Two 5/8" curtain rings for each tieback.
Gauge: Not important for this project, but if your stitches
look too loose, try a size E
hook
Finished size of valance: As pictured, overall length =
about 10", length below rod
pocket=about 8", Length is easily adjusted by adding or
subtracting rows. The
width of the valance is worked to fit your window and is
determined by the length of
the foundation row.
Finished size of tiebacks: As pictured, about 16" long
overall x 1 1/4" wide
Finished size of edging: About 1" wide x any length
Valance
Foundation row: *Ch 4, dc in the 4th ch from hook* Repeat
from * to * an even
number of times (so that you have an odd number total) until
the length of the
foundation row is equal to 1 ½ - 2 times the width of your
window; ch 2, turn.
(Pattern note: The "ch 2" at the end of the rows
does not count as the first dc of the
next row.)
Row 1: (Front) Work 5 dc in the first ch-4 space, sc in the
next ch-4 sp, (7 dc in the
next ch-4 sp, sc in the next ch-4 sp) across, ending with 5
dc in the last ch-4 sp; ch 1,turn.
Row 2: Sc in the first dc, ch 3, skip next dc, sc in the
next dc, *ch 4, skip next (2 dc,
sc, 2 dc), sc in the next dc, ch 3, skip next dc, dc in the
next dc* Repeat from * to *
across; ch 2, turn.
Row 3: Work 5 dc in the first ch-3 space, sc in the next
ch-4 sp, (7 dc in the next ch-3 sp, sc in the next ch-4 sp) across, ending with 5 dc in the
last ch-3 sp; ch 1, turn.
Rows 4-23: (Repeat rows 2 & 3) 10 times for and 8"
length below the curtain rod.
Add or subtract rows to adjust to the desired length. Fasten
off after the last row.
Rod pocket
Row 1: With the wrong side facing you, join yarn with a sc
around the post of the
first dc of the foundation row, work one more sc around the
same dc, (2 sc around
the post of the next dc in the foundation row) across; ch 4,
turn.
Pattern note: The rod pocket in this pattern accommodates a
small-diameter rod. If
you need a bigger rod pocket, substitute (ch 5's and dtrc's)
or (ch 6's and ttrc's) for
the ch 4's and trc's in row 2 (front and back.)
Row 2: (front of rod pocket) Trc in the front loop only of
the first sc, trc in the front
loop only of each remaining sc across, ch 4, sl st in the
front loop only of the same sc
in which the last trc was worked; turn.
Row 2: (back of rod pocket) Sl st in the unworked loop of
the first sc on row 1, ch 4,
trc in the same st, trc in the unworked loop only of each
remaining sc in row 1 to
within the last sc, 2 trc in the unworked loop of the last
sc; ch 1, turn.
Row 3: (crocheting front and back of rod pocket together)
Insert hook into the 4th
ch of the turning ch on the front of the rod pocket and into
the first trc on the back
of the rod pocket and pull up a loop, yo and pull through
both remaining loops on
hook; (insert hook into the next trc on the front of the rod
pocket and into the next
trc on the back of the rod pocket and pull up a loop, yo and
pull through both
remaining loops on hook) across; do not sc together the
turning chains at the end of
the row; ch 1, turn. (You should have an odd number of sc.)
Row 4: Sc in the first sc, (ch 3, skip next sc, sc in the
next sc) across; ch 2, turn.
Row 5: Work 5 dc in the first ch-3 sp, (sc in the next ch-3
sp, 5 dc in the next ch-3
sp) across; ch 2, sl st in the last sc. Fasten off.
Tiebacks
Foundation row: *Ch 4, dc in the 4th ch from hook* Repeat
from * to * 20 times or
an even number of times (so that you have an odd number
total) until the length
desired for each tieback; ch 2, turn.
Round 1: Work 7 dc in the first ch-4 space, sc in the next
ch-4 sp, (7 dc in the next
ch-4 sp, sc in the next ch-4 sp) across, 7 dc in the last
ch-4 sp, 15 sc in one of the
curtain rings, sl st in the first sc on the curtain ring;
continuing around the other side of the tieback, (work 7 dc around the post of the next dc on
the foundation row, sc around the post of the next dc on the foundation row)
across, ending with 7 dc
around the post of the last dc on the foundation row, 15 sc
in the other of the lucite
rings, sl st in the first sc on the curtain ring; join with a
sl st in the top of the first dc.
Fasten off.
Curtain edging (to be sewn to the hemline of a cloth curtain
or sheer)
Foundation row: *Ch 4, dc in the 4th ch from hook* Repeat
from * to * an even
number of times (so that you have an odd number total) until
the length of the
foundation row is equal to the width
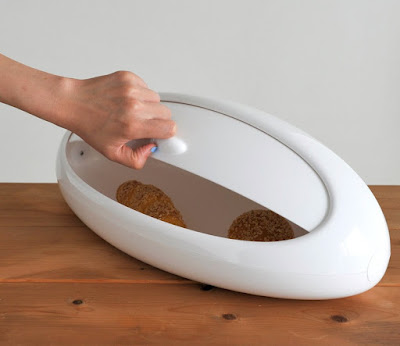
Bread Box
I'm in need of this let see when will the order be placed and i will got it or not?
The Gnam bread bin from Alessi is made from thermoplastic resin and comes in black, white and orange. (Amazon.com doesn’t have the orange version.)
xxxxxxxxxxxxxxx
No comments:
Post a Comment